loving lately.

loving lately

1 / 2 / 3 / 4 / 5

Happy Friday! Welcome to another edition of ‘loving lately’!

1) Converse One Star lounge pants. You guys, I’ve practically been living in these pants since the day I brought them home. I picked them up on a whim recently (Target clearance rack — need I say more?) and now I’m wishing I would have bought a few more! (Update: I went back for another pair!) In addition to comfort, I’m a sucker for any lounge pants that sport pockets.

2) Nourish Organic Face Cleanser. Aside from the packaging being just as adorable as the face crème’s (reference this post), it also scores points for its gentle factor and that it can be used on any skin type. And it goes without saying how much I love that it boasts the USDA organic seal and doesn’t contain all of the harmful ingredients that so many standard face washes do these days, i.e. parabens, phthalates, petrochemicals and EDTA.

3) Essie nail polish in ‘Honey Bun.’ I think it’s easy to get caught up in the trends and opt for bold nail polish shades + designs, but at the end of the day I prefer classic colors like mauve, red, nude, etc. and this one fits the bill perfectly.

4) Eco Candle Co. candle in the scent ‘Lovely.’ This sweet soy candle is described as “a feminine blend of citrus, floral and woodsy notes that is both casual and glamorous.” — I couldn’t have said it better myself! Runner up from this company is the scent ‘Chamomile Sage.’

5) Floral scarf. Target clearance strikes again. This recent purchase has quickly become a new favorite. Scarfs are always associated with the colder months but the light fabric plus floral pattern of this one makes it suitable for wear spring through fall.

What products have you been loving lately?

Leave a comment

Filed under Loving Lately, Reviews

back entry + DIY key/coat rack

entry way

DIY key rack

DIY key rack

Hello friends! Today I thought I’d show an update of the back entry (really the eat-in kitchen) of our house as well as a new piece I made — a wooden key/coat rack inspired by 7th House on the Left and my DIY towel holder.

To make the rack, I simply cut a piece of scrap wood I had to the same size as the chalkboard window above it, gave it a coat of walnut stain leftover from this project, stenciled on some numbers, and lastly added four hooks I had picked up on sale at the craft store for $1.49/ea. a while back.

More projects to report on soon!

jeanette

Leave a comment

Filed under DIY, House & Home

DIY window boxes.

Last month I mentioned in my curb appeal post that if I only crossed *one* item off my curb appeal to-do/wish list, it would be to install window boxes. I am happy to report that the boxes are now built, installed and boasting pretty red blooms!

diy window box

You might remember I debated buying vs DIYing. I ultimately decided to make my own for the sake of saving some major cash, plus you simply can’t beat the satisfaction of being able to say, “Hey, I made that!” when it comes to the completion of any successful DIY project.

The materials (wood, primer + paint, screws & four L-brackets) ended up coming in at just around $60, as opposed to $150/each for the pre-made ones I had been eyeing at the home improvement store. You can probably do the math but that means I saved a total of $240 by making them myself — score!

diy window box suuplies

First I got all of my wood cut to size, followed by priming it all with an oil-based primer. From there I attached all of the pieces using a nail gun. Once assembled, I filled in the nail holes with spackle and caulked along the inner corners. I then gave the boxes two coats of glossy white paint made for indoor/outdoor use. Lastly, I drilled six drainage holes into the bottom of each box and lined the boxes with burlap so that water can get through the holes but the dirt can’t. The final step was to secure the boxes to the house which I did by using two 8″x8″ L-brackets per box and the help of this tutorial. Oh yeah, and the hubs helped out a lot, too.

DIY window box

To make the boxes look less plain and more “custom,” I added lattice strips to the front. I also figure that if I ever want to take the “custom” look a step further, there is always the option of attaching decorative corbels to the bottom as well.

DIY window box

As much as I wanted to do something bold and really eye-catching to fill the boxes, I kept it simple this time around by going with red impatients to complement our red front door. Next year I plan to get more creative and opt for a mix of plants like this, aka the “filler, thriller, spiller” method.

So there you have it — my DIY window boxes! I’m so glad to be able to check this project off my home improvement list. But of course there are many more boxes to be checked…

Until next time!

1 Comment

Filed under DIY, Gardening, House & Home

DIY garden sign.

Two posts in the same week from me? Crazy, I know. I’m trying to get back to regular blogging here people, “trying” being the keyword.

So I posted this photo on Instagram a few weeks back of a new garden sign I picked up on clearance for $8 at Hobby Lobby. I had been wanting to make one myself, but a mix of laziness and a tempting red clearance sign got the best of me so a store-bought sign it was. Despite this sign being located in the outdoor garden decor section, it only took 20 minutes of the sprinkler hitting it before all the letters just melted right off the day I hung it up. Wah, wah, wah. So I was left with a blank (yet pleasantly distressed-looking) piece of $8 wood. It was clear this was meant to be DIY from the start…

I decided to keep it simple by using my bold Arial font stencils and black paint. It doesn’t look as pretty as the store-bought one, but sometimes basic is best. This ended up being my easiest DIY sign, yet ironically the most expensive. Without further ado, my simple garden sign:

DIY garden sign

DIY garden sign

DIY garden sign

Click the links to check out my four other DIY signs — Dream | Fresh Eggs | Garden Tour | Market

And on the subject of gardens, I am about due for an updated “how does your garden grow” post to show you guys what we have sprouting up this year.

Until next time…

jeanette

3 Comments

Filed under DIY, Gardening

loving lately.

loving lately1 / 2 / 3 / 4 / 5 / 6

Hey guys! I have some new [home] project posts in the works but in the meantime I thought I’d show you few products I’ve been loving lately…

1. Tera’s Protein Powder. I recently purchased two tubs of this protein powder when it was on sale at my local co-op (one dark chocolate whey & one honey vanilla goat) and have been very pleased with both. Previously I had been using vegan protein powders, but the taste + texture seemed off on all the one’s I tried. Tera’s, on the other hand, boasts great flavor + texture and a hearty amount of protein per serving (20 grams!). I also love that almost all of her products are organic and/or fair trade.

2. Mini alphabet stamp kit. Whether it’s for making custom cards or cute labels, this stamp kit of mine has gotten plenty of use in the past few months.

3. Born Paulette Flats. I bought these at a consignment shop in near-new condition last fall for $14 (they retail for $105) and I’ve definitely gotten my money’s worth. These flats are super comfortable and can pair with just about any outfit, aka my kinda shoe.

4. Ball Sip and Straw Lids. If you like drinking your juices and iced coffee in mason jars like me, these to-go lids are a must!

5. Fresh flowers. Either from the farmers market or my backyard, I can’t get enough fresh flowers lately and having small bouquets throughout my house (even if it’s just one bloom in a little vase!) Psst — interesting article on the benefits of having flowers in the home here.

6. Beeswax candles. I recently started purchasing pure beeswax candles from our farmers market and I’m smitten. Beeswax candles have long been known for their air purifying effects and can greatly reduce dust and other allergens in the home. They also burn clean and up to three times longer than paraffin candles. Awesome, right!? Find them at your local farmers market, co-op, or online.

What products have you been loving lately? See my last ‘loving lately’ post here.

Leave a comment

Filed under Loving Lately, Reviews

a call for curb appeal.

Hey, guys! Long time no post, eh? With the warm weather we’ve been having here in Minnesota, I have been outside every chance I get. It’s finally raining today so I decided I’d finally sit down and reunite myself with the blog. On the subject of being outside, today’s post is all about curb appeal!

I’ve put a lot of effort into updating the interior of our house the past [almost] two years and now I’m looking to do the same outside. Last year you saw how I updated the facade of our house by painting the door red and the shutters black in place of the pine green color they were previously sporting… But that was about all I did in terms of boosting our curb appeal.

This summer I’m determined to step it up! So far I’ve replaced our house numbers for more modern ones, mulched the front garden (I went bold by using red mulch instead of traditional Cypress, see below), and added a few new plants. (As for the backyard, you can check out the mini flower garden I made and the vegetable garden we built HERE).

curb appeal

But there is still a lot I want to do yet this summer in the front…

curb appeal wish list1 / 2 / 3 / 4 / 5 }

1 – First up is window boxes. If I only accomplish one more “curb appeal” item this summer, I want it to be window boxes. I love how such a simple feature can add so much charm to a house, like this, for example. Now it’s just a matter of deciding to DIY or buy… Keeping more $$$ in my wallet sounds appealing, but I’m drawn to the idea of saving my sanity time by skipping the DIY and going with a store-bought version that will more than likely last longer than my handmade one… What do you think?

2 & 3 – While #2 isn’t huge on the priority list, I’d really like to replace our front light with a more modern version that better fits our style. (For reference, this one is comparable to what we have now). We might not get around to tackling that this year, but we’re definitely planning to add pathway lighting which is an easy and relatively cost-effective way to spruce up the front of a house.

4 – Rain chains! Not only do they serve a practical purpose (help divert rainwater runoff and reduce soil erosion outside the home), they also look cool! Getting one of these isn’t a must-have by any means but if I come across one for a good price it will definitely be coming home with me!

5 – Last but not least, a new door mat. We bought a standard “Welcome” one when we first moved in which is now at the end of its life. This time around I’d like to go with one that is more fun & colorful like shown in the pic above.

So there you have it — my plans for boosting our curb appeal this summer. What things have you done (or plan to do) to make the outside of your house more appealing?

jeanette

Leave a comment

Filed under Gardening, House & Home

oat pecan burger.

oat pecan burger

The co-op here in Rochester makes a mean oat pecan burger. It’s so good that I tracked down the recipe so I could make it myself! Aside from being able to make these whenever a craving strikes, I’m also saving money by making them at home. This is a hearty burger that both meat-eaters and vegetarians will love!

Oat Pecan Burgers (vegan, gluten-free)

Adapted from 3 Angels Fellowship

Makes approx. 7-8 burgers

Ingredients

  • 2 cups water
  • 1/4 cup Bragg’s (liquid aminos) or tamari
  • 2 Tbs. + 2 tsp. canola oil
  • 1/2 cup chopped pecans
  • 1/8 cup nutritional yeast
  • 1/2 Tbs. dry basil
  • 1 tsp. garlic powder
  • 1 tsp. onion powder
  • 1/2 tsp. coriander
  • 1/2 tsp. sage
  • 2 cups gluten-free rolled oats

Directions

  1. Place all ingredients into a large pot except the oats and bring to a slow boil.
  2. Stir in rolled oats and remove from heat.
  3. Let cool and shape into patties. Note: the cooling process takes about 30 minutes.
  4. Heat a small amount of oil in a pan. Once warm, fry the patties until lightly browned on each side.

Serve on a bun with your favorite fixins! I’m a fan of lettuce, organic ketchup and vegenaise (if you haven’t tried it, you are missing out!).

Sprouts, tomatoes, pickles and/or avocado slices would also be good options.

oat pecan burgers

oat pecan burger

Enjoy!

3 Comments

Filed under Recipes

latest book buys.

books

I’ve been on a book binge lately. As in, I buy a book with the intention of reading it right away but somehow buy another before I even opened the one before that. Nonetheless, I am determined to read the last five I picked up before I buy any others and suppress my urge to have a “library room” like this

1) Eat Pretty — I’m convinced that what we put into our bodies has a definite effect on our overall appearance and well-being — skin, hair, nails, weight, etc. This book emphasizes just that and unveils the “beauty-boosting benefits” of various foods and also points out the ones that are inhibiting us from looking/feeling our best. In addition, Eat Pretty offers a handful of recipes and explores stress management, hormonal balance, and mindful living.  As if the content weren’t intriguing enough, can we talk about how cute that cover is?!

2) Folks, This Ain’t Normal — This particular book was selected as the April read for the healthy living book club I am a part of. Needless to say, I’m running a bit behind… whoops.  The book is based on the notion that farming (and our day-to-day living) is no longer simplistic and sustainable as it once was. The author talks about the importance of foods that are wholesome, seasonal, raised naturally, and procured locally. This is the kind of book that will leave a reader re-examining not only their diet, but how they spend their free time (i.e. electronics versus quality time with loved ones).

3) Clean — As if you haven’t already picked up on my love for books that focus on healthy living, this is yet another one that falls in that boat. Author Alejandro Junger talks about the solutions to the common ailments many Americans face today that come as a direct result of the toxic build-up in our bodies. Sounds interesting, right?

4) The Antelope in the Living Room — Now for a non-health-related book! I picked this one up after coming across a few positive reviews from blogs I peruse on the regular. Melanie (author) tells a light-hearted, honest story about the ups and downs of marriage from a personal stance. I’m only a few pages in but can tell it’s going to be a humorous and worth-while read!

5) The ‘Oh She Glows’ Cookbook — Okay, so this isn’t exactly a book that requires a whole lot of “reading” per say, yet I would still like to make a point to flip through every page and take note of the recipes I’d like to make in the near future. Angela, the author and blogger over at Oh She Glows, boasts a bounty of gluten-free, vegan recipes that will make you glow from the inside out. It doesn’t hurt that her pictures are amazing!

What books have you been reading (or meaning to) lately? Have you read any of the five that I mentioned?

Leave a comment

Filed under Health & Wellness

bathroom makeover + DIY concrete counters

Happy Monday!

I’m finally getting around to showing you the before + after pics of my main floor bathroom makeover which included DIY concrete countertops! I also revamped the vanity by giving it a fresh coat of paint and new hardware. (Note: prior to this project, I painted the walls and changed out the mirror but don’t have any before/after pics of that).

Let’s get to the details, shall we?!

bathroom before and after

before

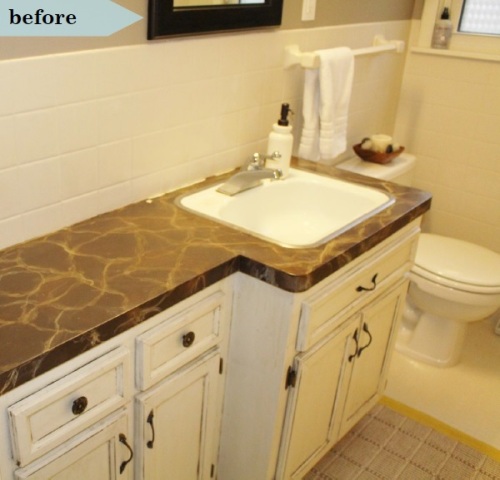
As you can see in this before pic, the countertop was a 60s-era laminate that was not only unattractive, but was starting to chip away in some spots (mainly behind the sink). Rather than spend a few hundred bucks to replace the countertop (we already recently did that in our upstairs bathroom, seen here), I had a much cheaper alternative in mind. I’d been seeing a few tutorials for concrete countertops floating around on Pinterest, namely this one and this one, which turned out to be the perfect solution since I could just apply the cement right over the current countertop.

concrete countertops
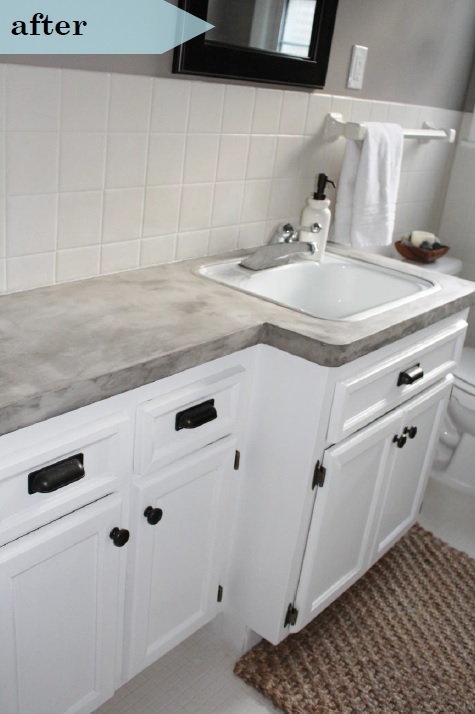
A bag of cement, a container of sealer, plus a few weeks worth of time and here we are!

(If you want a detailed step-by-step tutorial, reference the two links above). One thing I will point out, however, is that once you’re done with applying and sanding the cement, the instructions on the sealer say to not use the sealer on cement that is less than 7 days old in order for the cement to fully cure. This is something that wasn’t mentioned in any of the tutorials I looked at but I think it’s important to note for the sake of knowing exactly how long this project will take you from start to finish. For me it was two weeks — applying and sanding three coats of cement to the counters over the course of one week and waiting an additional week to seal.

concrete countertops

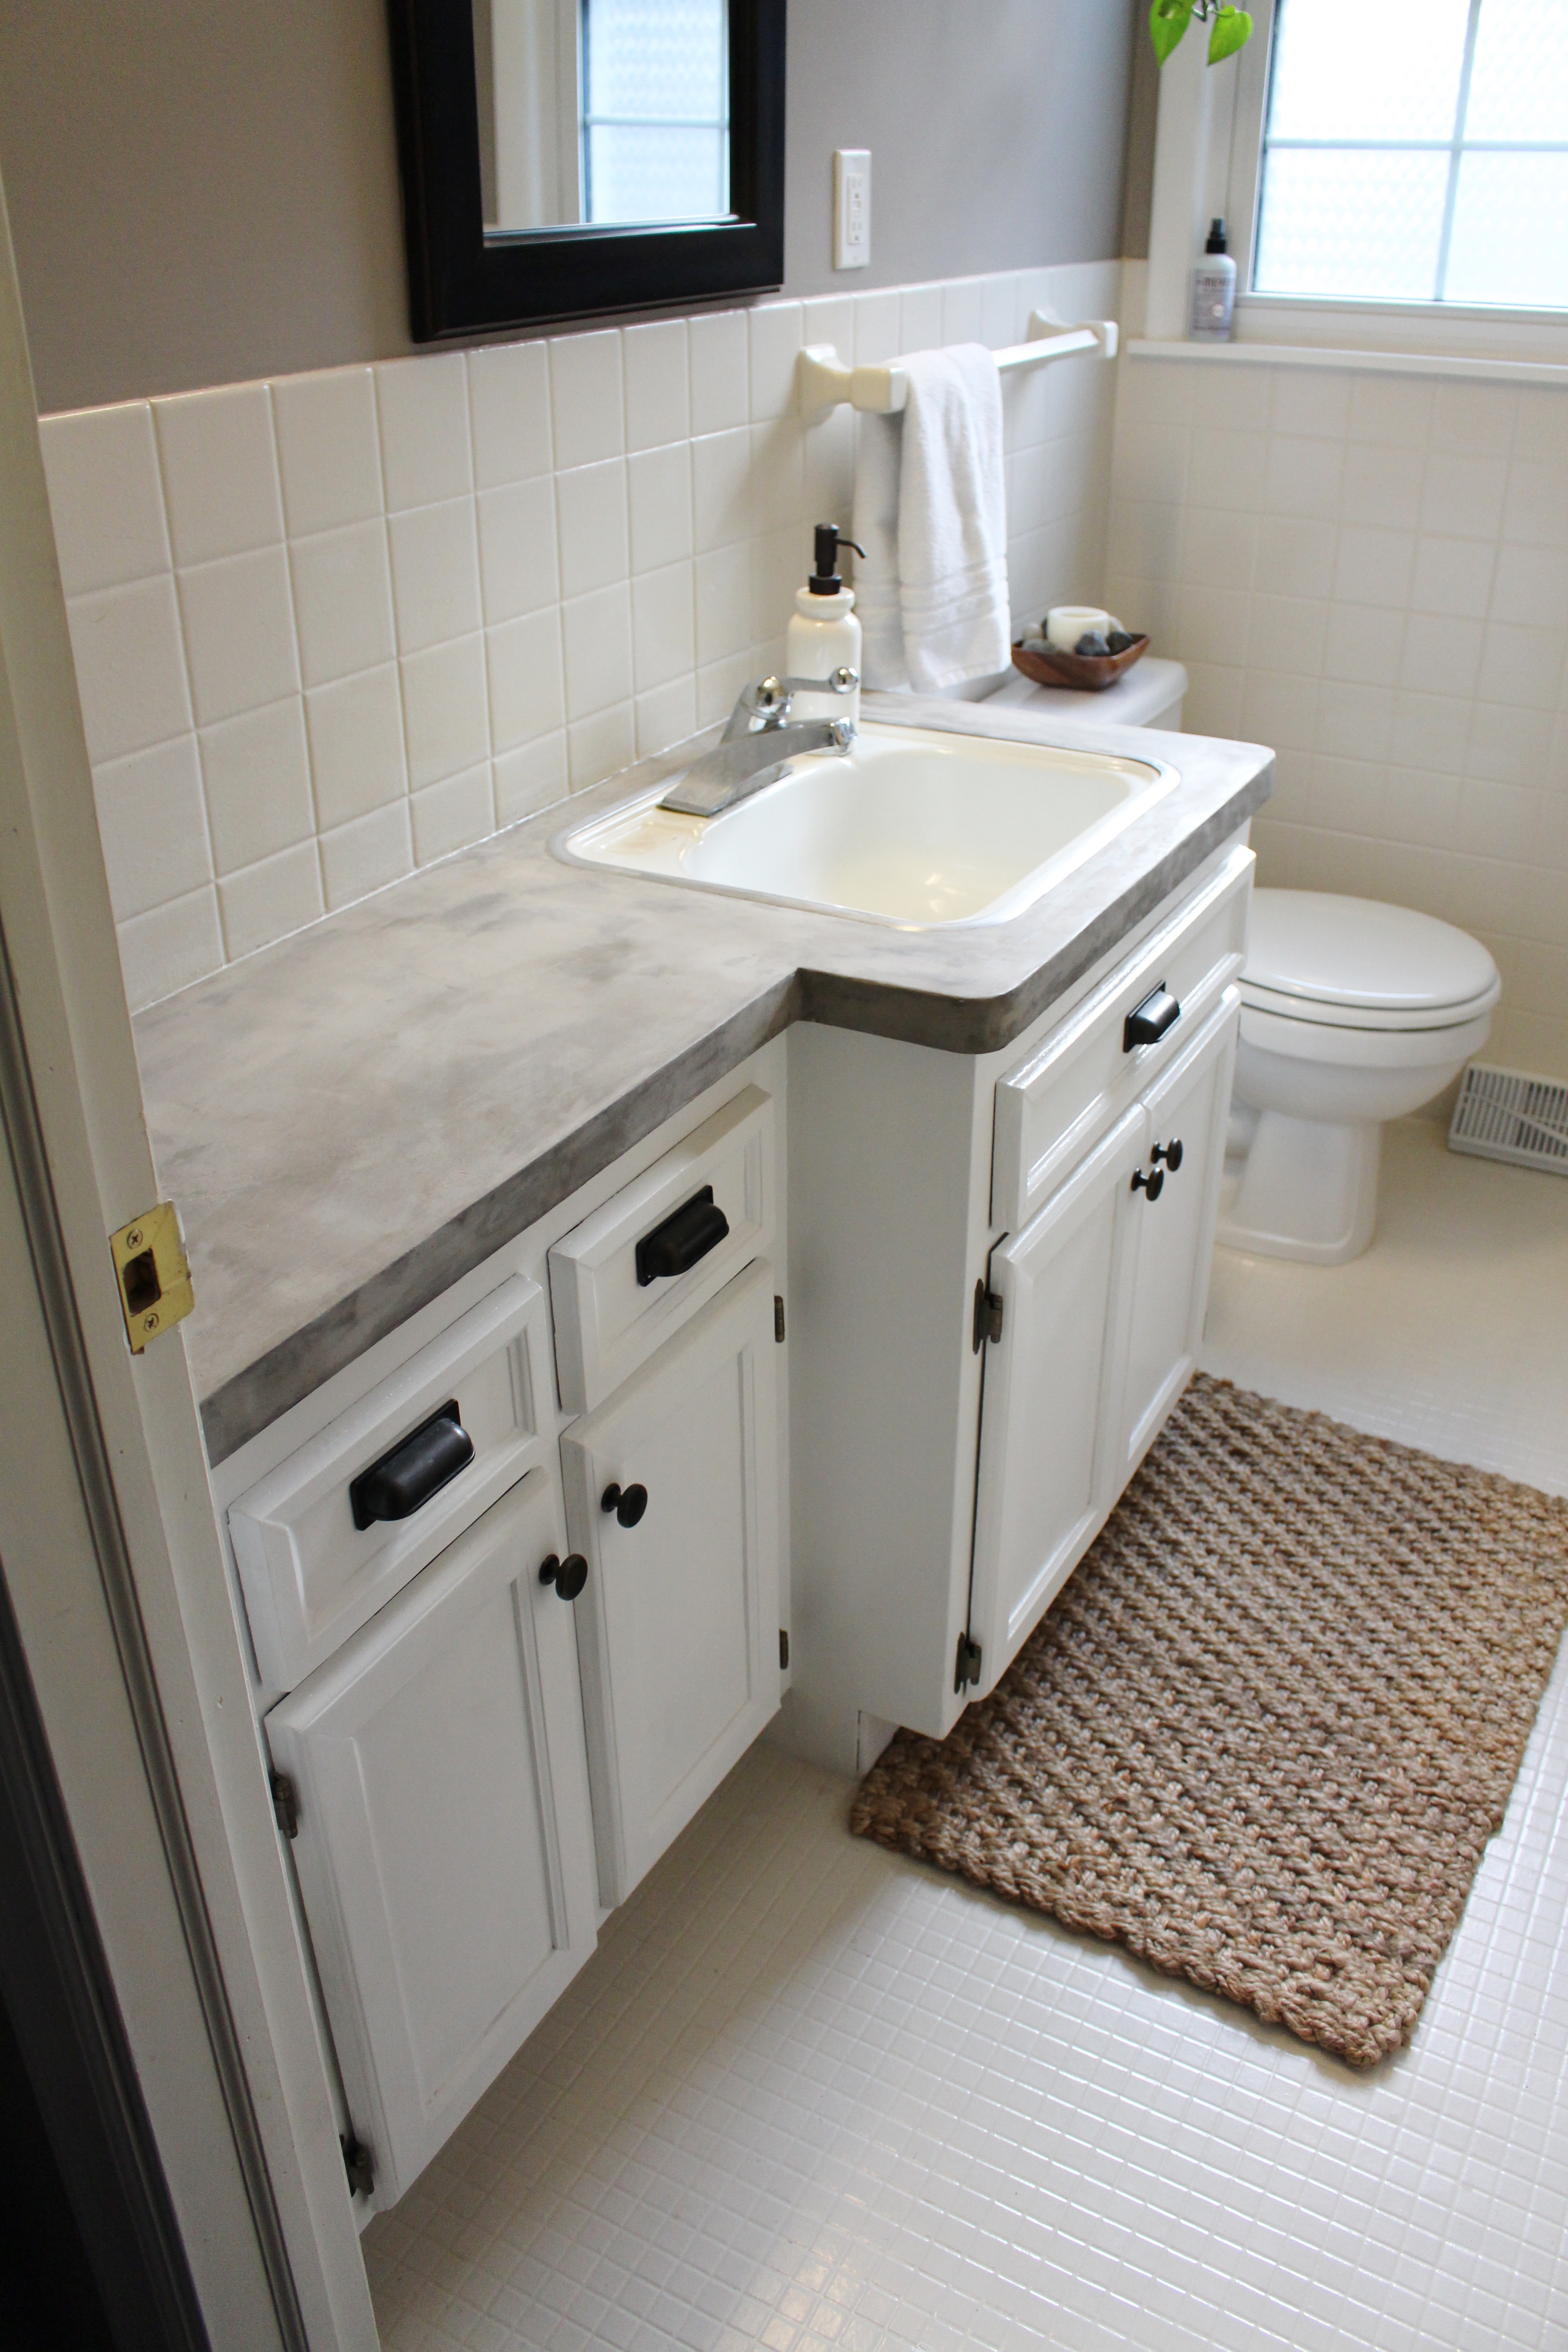
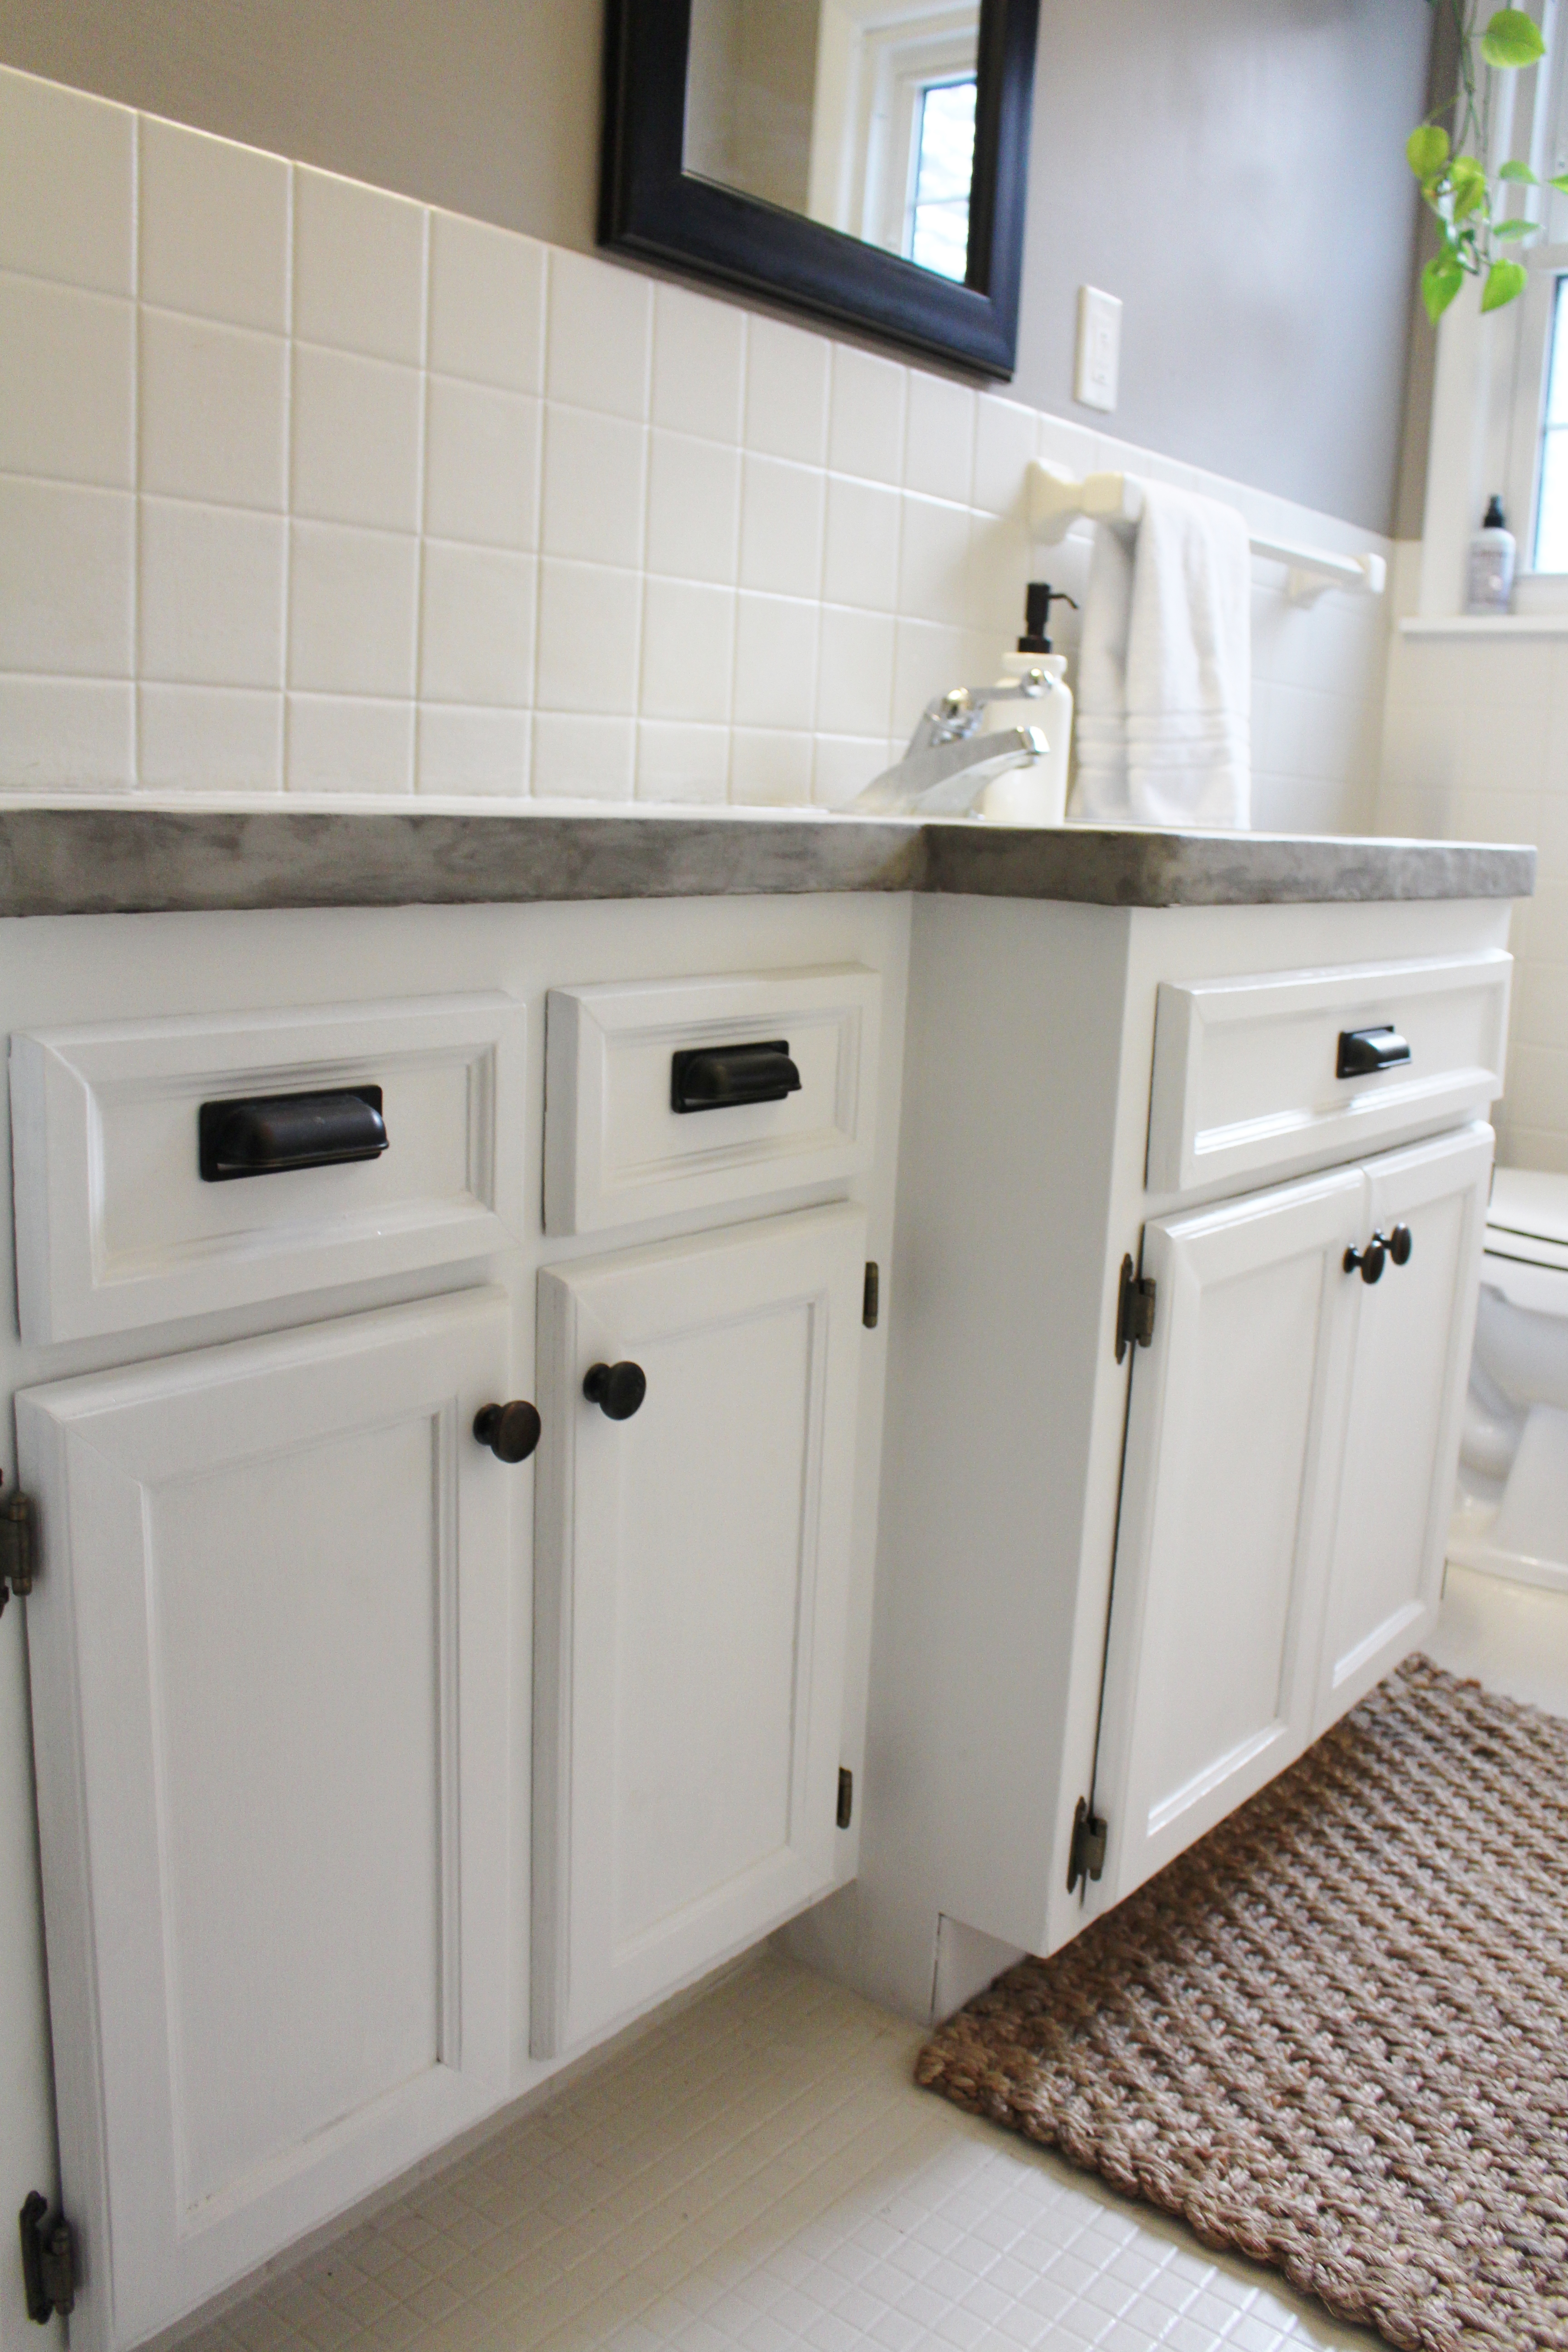
You guys know from reading my kitchen cabinet makeover post that I am not a huge fan of distressed cabinets because it can be hard to differentiate paint from dirt/grime. The same distressed finish that was in our kitchen was also on these cabinets (wah, wah, wah). I gave them a good sanding followed by one coat of bonding primer and one coat of paint in ‘coffee white’ by Valspar. The window trim was also sporting the distressed finish (not really visible in the photos), so that got a few coats of new paint, too. The room feels so much brighter and cleaner now!

bathroom vanity makeoverI also replaced the hardware on the vanity using some knobs & pulls that a friend of mine salvaged from when she remodeled her 1920s kitchen. It was a bonus that they happened to match the mirror frame perfectly! And while we’re not sure, we think they could be original to her house, making them antiques — bonus!

before and after

Shortly after I started this project I was super excited to see that DIY-pros John and Sherry from the infamous Young House Love blog were also working on adding concrete counters to their house. You can see their in-depth tutorial here!

diy concrete counters

diy concrete countertops

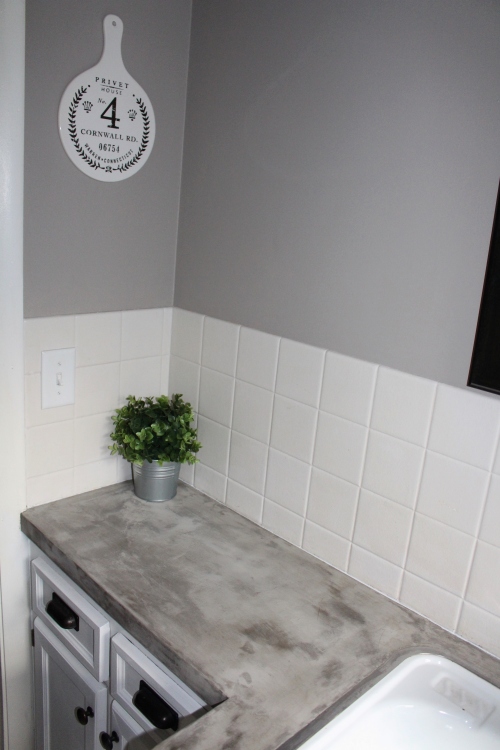
The counters clearly show the trowel marks and various spots created by air bubbles and sanding. While this look may not be for a lot of people, I love the uniqueness of it — no two concrete counters are ever alike!

diy concrete countertops

window wall art

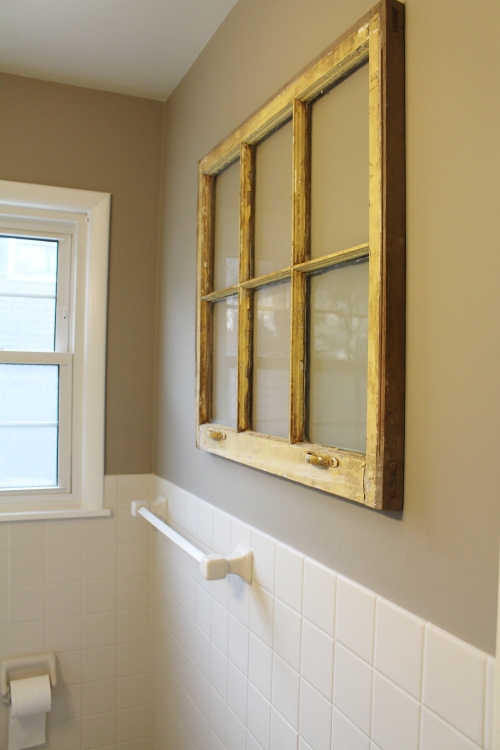
To go along with the new “industrial” feel that the concrete countertops gave this space, I hung up one of my antique windows that had previously been in the office.

bathroom makeover

Overall, I’m really happy with how the counters turned out. Now it will just be a matter of seeing how well they wear over time.

As for the room as a whole, I’d still like to get a new sink + faucet, and possibly opt for a different light fixture (similar to the one in the basement guest bedroom), but for now I’m calling this space good!

Want more before + afters? See our basement bathroom makeover here and our upstairs one here.

What do you think — could you see concrete counters being a fit for somewhere in your house?

Leave a comment

Filed under DIY, House & Home

DIY “dream” wall art.

Aside from the “bigger” projects I’ve been working on as I mentioned in my last post, I’ve also intermittently been working on a few smaller-scale projects like what I’m showing you today.  Say hello to my latest piece of DIY wall art!

diy wall artThis project ended up being completely free because I already had the supplies laying around. Don’t you love it when that happens?

diy wall artI’d been on the lookout for some wall art for this space for a while but hadn’t come across anything I really liked or was willing to spend the money on. While rummaging through our workroom a few weeks back, I was reminded of some scrap wood that I had left over from a previous project (this one, to be exact).

First I secured the wood together with a flat brace. I purposely secured them unevenly for a more “worn” look and painted over them with several coats of different colored paint to distress it. (Check out my distress how-to here). From there, I printed out the letters from a Word doc, cut them, and traced them onto the wood. Once I filled in the trace marks with black paint, a little more distressing took place and that was it! Easy peasy huh?

diy wall art

I am thinking of making a smaller one similar for the office that either says “inspire” or “create.”

This is a project anyone can do at home. Even if you don’t already own the supplies, wood is pretty easy to come by for cheap and all you need are some stencils and paint.

Click the links to check out my other DIY signs — Fresh Eggs, Garden Tour, Market.

jeanette


P.S. The main floor bathroom project is complete… I just didn’t get around to taking pictures over the weekend. Stay tuned for an update within the week and head to my Instagram for a sneak peek!


Leave a comment

Filed under DIY